While there is no such thing as "fool-proof", this recipe is very close to it. I created it to be very forgiving - one that can grow into your starter's strength. It has been made with several flours successfully: Caputo Fioreglut, King Arthur (bread Flour, 1:1 and all purpose), Namaste, Pamela's to name a few. The most successful has been Caputo - amazing results all the way around. The most mediocre has been from Bob's 1:1 - great flavor but more dense and a bit gummy. Great once sliced and toasted though.
This particular version of my recipe is egg and dairy free, in addition to gluten-free.
Why This Recipe Works:
Honey. The honey (can be replaced with syrup or even cane sugar) does for yeast what sugar does for a toddler. It's a snack they love, causing the yeast to aggressively eat. The result is a nice lofty rise!
Apple Cider Vinegar. This was a difficult one for me to wrap my head around when I first learned of it. However, I quickly fell in love and use it in nearly all my yeast recipes now. It is another help for the leavening and creates an even lighter airier crumb. For the sourdough you can be a bit heavy handed to create a more enhanced sour to your bread as well. Other vinegars will do the same, but the mild sweetness of ACV helps keep it from overpowering most recipes.
Psyllium Husk. A binder that helps to replace the gluten. While many flour blends do include Psyllium or Xanthan Gum, additional is required. The role of such binders is to create elasticity and flexibility, making the dough easier to manage and shape, holding shape while baking. Note that Psyllium can turn your bread purple. To avoid this, try to choose blonde psyllium especially for powder - or use whole psyllium husk.
Almond Flour & Nutritional Yeast. Sourdough requires protein to properly develop - something that is lacking completely when eliminating the wheat. When creating this recipe there were many requests for dairy and egg free - so almond flour was the highest protein flour I could find (aside from pea - which I do not care for the flavor of). However, almond flour is quite heavy. To help minimize a dense loaf I found a good balance with nutritional yeast. The nutritional yeast is super light but does add a bit of a nutty/cheesy flavor if overdone. Omitting either of these will result in a gummier loaf, but still great sliced and toasted. Nutritional yeast can be omitted entirely. Almond flour would require adding 75g more flour. Substitutions: You can try any unflavored protein powder in place of the almond flour. Egg whites could be a great option to try as well - but hydration would have to be adjusted. I would suggest using 2 egg whites, reducing water by 70g.
Caputo Fioreglut. This is the most amazing flour I have ever used. Since it uses wheat starch you get all of the flavor and some of the properties of wheat. It handles beautifully. Other flours can be substituted, but you may have to adjust the hydration level a bit. I'd actually love to see and hear about your results with other flours. Disclaimer: Please, if you are not familiar with Caputo flour, understand that it contains "gluten-free wheat starch". This is wheat that has had the gluten stripped, to a point that it is within the standards of being FDA approved as gluten-free (well under the 20ppm requirement). This means that it is usually considered safe for those who are just sensitive to gluten and mild/moderate celiacs. It is definitely not recommended for anyone with a wheat allergy (it is still wheat). Some with more severe celiac still can tolerate it, but that is something only you can decide to try. Anyone with any questions or doubt should discuss with their doctor before consuming.
Description
While there is no such thing as "fool-proof", this recipe is very close to it. I created it to be very forgiving - one that can grow into your starter's strength. It has been made with several flours successfully: Caputo Fioreglut, King Arthur (bread Flour, 1:1 and all purpose), Namaste, Pamela's to name a few. The most successful has been Caputo - amazing results all the way around. The most mediocre has been from Bob's 1:1 - great flavor but more dense and a bit gummy. Great once sliced and toasted though.
Ingredients
Wet Ingredients
265grams GF sourdough starter (I use Bob's 1:1 starter)
280grams water warmed to 112°f (filtered or bottled (not city tap))
12grams psyllium husk (powder or whole, blonde to avoid purple color)
5grams active yeast (optional - for use with younger/weaker starters. Omit once starter is strong)
10grams honey
1Tbsp apple cider vinegar (can increase to 2 for more sour flavor)
20grams olive oil
Dry Ingredients
320grams Caputo Fioreglut Flour
40grams almond flour (super fine ground (I use Bob's Red Mill))
1Tbsp nutritional yeast (optional)
2tsp baking powder (double acting) (optional, but great help with oven spring)
12grams kosher or sea salt (do not use iodized salt)
PRE-MIXIING PREPARATIONS
Prepare the following before mixing begins:
1
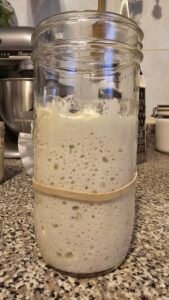
GF Sourdough Starter (Levain)
In the morning, feed your starter enough to create the 265g for the recipe, plus additional to account for what is absorbed/evaporated and enough to maintain for future bakes. A total of 350g is a good number to go for. Example: 50g starter - 150g gf flour - 150g water
Note that a thicker starter is best for this recipe, so don't follow the usual "pancake batter rule"
Once it has peaked (or just prior) it is ready to mix. It should peak by the same amount that it normally does. If it normally doubles, watch for this Levain to double. If it normally rises by 50%, that is what you will watch for.
2
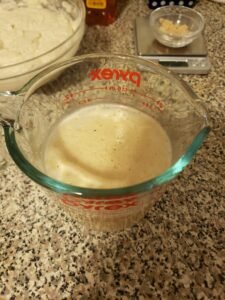
Make Psyllium Gel
Warm 200g water to 112°f
Whisk in gel, being careful to break up any lumps
Set aside 10-15 minutes to gel
Remove any remaining lumps before adding to other ingredients
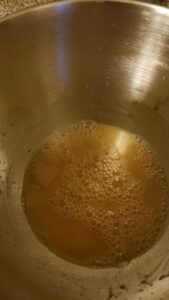
3
Proof the Yeast (if using)
Warm the remaining 130g water to 112°f
Add honey and yeast, stir
Set aside for 5 minutes
If top is foamy the yeast is good and ready to be added to other ingredients.
If no or very little foam the yeast is likely no good. Omit or repeat this step using a fresh jar or packet.
WET INGREDIENTS
4
See "Pre-mixing Preparations" first
To large mixing bowl add peaked starter, psyllium gel, proofed yeast (or remaining water), olive oil and apple cider vinegar.
Use paddle attachment to mix until well blended.
Change to dough hook
DRY INGREDIENTS
5
In a large bowl, sift or whisk together all dry ingredients: Flours, baking powder, nutritional yeast, salt.
Turn mixer onto low, slowly add dry ingredients to wet.
Once all is incorporated stop the mixer. Scrape sides of bowl down with spatula
Increase speed to medium, mix for 5 minutes.
KNEAD, SHAPE, PROOF
6
Knead
Place dough onto floured surface, it will be sticky!
Gently knead in more flour, a few grams at a time, until the dough is no longer wet. It should be mildly tacky but manageable, and will hold it's shape for a few seconds.
7
Shape.
Gently shape into a tight small ball
Fold dough in half, turn, fold in half again.
Stretch each side into the center, pinching to seal.
Repeat if needed to create a small tight round ball.
Lightly flour if needed to prevent too much sticking.
NOTE: Watch video to see how I get it to the proper texture and shape.
8
Proof
Prepare a bowl for proofing by lining it with a tea towel or proofing cloth.
Dust the cloth with white rice flour
Gently lift dough and place it in the bowl, seam side up.
Oil hands generously with olive oil and pat the exterior of the dough. This helps keep the dough soft as the liquid evaporates, makes a softer crust when baking.
Cover with another tea towel and place in a warm location (75-80°f is ideal)
Depending on how warm the location and how active your starter/yeast is it can take anywhere from 2-5 hours to proof, sometimes longer. The top should be starting to dome.
The "finger poke test" has worked well for me: Gently press on the dough, creating about a 1/4 inch indentation. Observe. - If it springs back quickly, it's underproofed - if it slowly springs back leaving a slight indentation it's ready - if it doesn't spring back at all, it's overproofed
9
Shape
Once dough is proofed, it is time to do a final shape.
Remove the towel, dust with white rice flour, and place your parchment paper or bread sling on top of the bread (the visible part of the dough will become the botton of your loaf).
Very gently invert and place on the counter
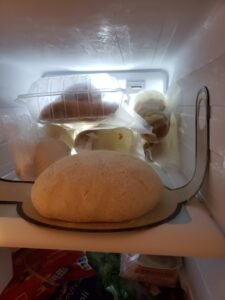
Tighten the loaf by gently tucking the sides under towards the center.
Place in freezer while the oven and Dutch Oven preheats
BAKE
10
Prepare to bake
Once proofed dough is placed in the freezer, begin pre-heating the oven & Dutch Oven to 500°f
After 30 minutes, gently remove the dough from the freezer.
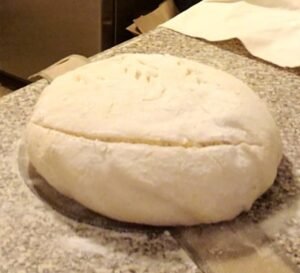
Sprinkle liberally with white rice flour, if desired, and score.
11
Bake
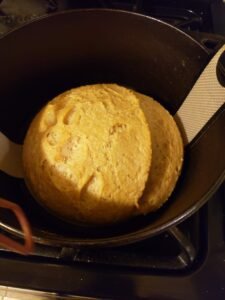
Reduce heat of oven to 450°f and remove DO.
Liberally spritz the top of your dough with water, toss in a couple of ice cubes (only if using non-enameled DO) then quickly lower your dough in and place lid to trap steam.
Bake 40 minutes covered, then remove from the oven.
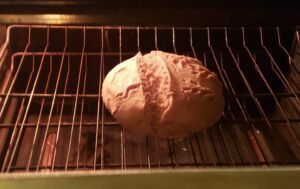
Reduce temp to 425° and gently return bread only directly on the rack.
Continue baking additional 20 minutes, or until the internal temp of the bread reaches 210°f.
Place on a cooling rack and allow to cool at least 4 hours before slicing. It will continue to develop as it sits, cutting too soon can interrupt the process and result in gummy interior.
After 2 hours I wrap mine in a tea towel to absorb excess moisture and soften the crust.
Pin this recipe to share with your friends and followers.
Kimmy Riccio
Gluten-Free Food and Lifestyle Blogger
Hi, I'm Kimmy - food blogger, mother, and wife. I live in Long Island, NY with my family. Love baking, sharing new recipes, camping, fishing and spending time with my family.